Newer devices
Starburst Turret
How to build things like this
Robot
About Me
Starburst Turret - How it works
The heart of the device is a microcontroller, which is a tiny, very cheap (like $6) computer on a chip. More on the microcontroller later; first I'll explain how the device works.
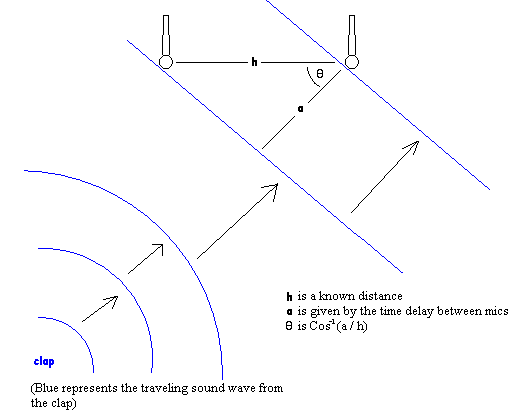
Two microphones tell the direction-- the delay between when one microphone hears the sound and when the other hears the sound depends on your angle, as shown below. (The turret can't tell distance; it just always throws a Starburst with the same speed.)
Firing Procedure:
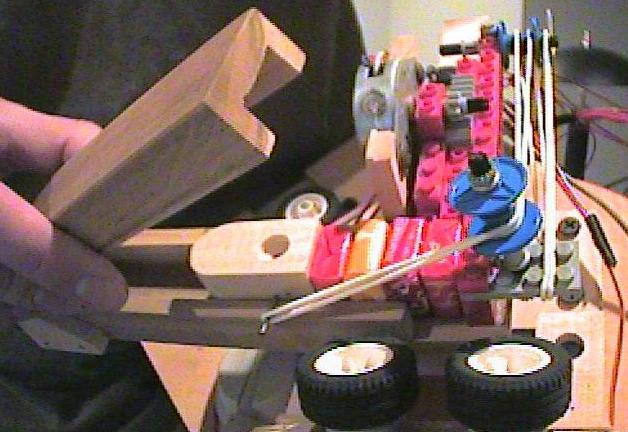
Once the microcontroller calculates the angle, it uses a step motor to turn the turret to that angle. The step motor has a Lego wheel stuck on it, which turns against the circular turret base. (The base sits on top of a “lazy Susan” bearing. Those bearings are great robot parts; around $2 from hardware catalogs.) The step motor was 79 cents (on sale) at Jameco.com.
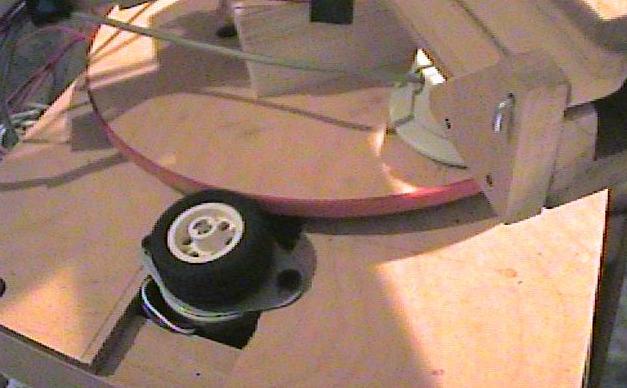
It turns on two DC motors, which spin in opposite directions and have Lego wheels stuck on them. I got the motors for free, but they wouldn't be expensive. They're just controlled with a transistor, and set up to spin so that a Starburst between them will be thrown forward.
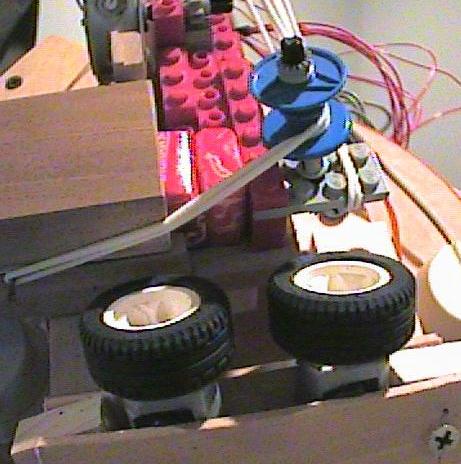
Next, it uses another step motor to turn a Lego rack-and-pinion setup, which pushes a Starburst from the Starburst magazine into the spinning wheels. Then the wheels shoot it in more or less the direction that the turret is facing, with a 45° up angle. It goes about 6 or 8 feet before dropping below the height of the turret.
Last, the step motor moves the Lego “bolt” back again, and another Starburst slides into position from the magazine. The magazine is made of wood and uses an elastic cord to push the Starburst forward; the elastic cord setup isn't very good, but I'm too lazy to make improvements now. Keep reading if you want to know about the microcontroller and the electronic circuit.
The microcontroller
The heart of the device is a microcontroller, which is a tiny, very cheap (like $6) computer on a chip. It runs a program and has many (like 16) pins, which can be inputs (reading a high or low voltage) or outputs (outputting either a high or low voltage). The cool thing is that you can access those pins from a program, and you can deal with millionth-of-a-second time scales. In the Starburst Turret, the signals from the microphones are inputs to the microcontroller, and it outputs signals to the transistors that run the motors. To use a microcontroller in a project, you just write a program for it on your PC and then transfer the program to the microcontroller. They're great devices for homemade robotics.
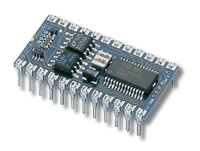
Basic Stamp
 I
originally built this with the Basic
Stamp 2 microcontroller by Parallax. If you're looking to
make
cool robotics-type things, I'd recommend it as a first step, as it's
made mostly for ease-of-use. It doesn't need an external programmer
like the PIC does (it just connects straight to a PC with a serial
cable which you can buy or make) and it's easy to write programs for
(it just uses BASIC, so if you can program at all, you can program
it). It is a lot more expensive than other microcontrollers; it's
around $50 for one. It's pretty user-friendly though, which PICs
aren't. If you want to get hardcore into this sort of thing, I'd
recommend doing what I did, which is buy a Stamp to get some
experience and confidence and then switch to the Microchip PIC or
another brand of microcontroller. With PICs, often programs don't
work at first because there's some setting you need to change, but my
Stamp programs usually worked on the first try. There's also a large
online community with a lot of projects you can learn from.
I
originally built this with the Basic
Stamp 2 microcontroller by Parallax. If you're looking to
make
cool robotics-type things, I'd recommend it as a first step, as it's
made mostly for ease-of-use. It doesn't need an external programmer
like the PIC does (it just connects straight to a PC with a serial
cable which you can buy or make) and it's easy to write programs for
(it just uses BASIC, so if you can program at all, you can program
it). It is a lot more expensive than other microcontrollers; it's
around $50 for one. It's pretty user-friendly though, which PICs
aren't. If you want to get hardcore into this sort of thing, I'd
recommend doing what I did, which is buy a Stamp to get some
experience and confidence and then switch to the Microchip PIC or
another brand of microcontroller. With PICs, often programs don't
work at first because there's some setting you need to change, but my
Stamp programs usually worked on the first try. There's also a large
online community with a lot of projects you can learn from.
PIC
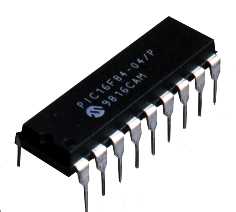 The
final version of the Starburst Turret uses a Microchip PIC for the
microcontroller. PICs are much cheaper than BASIC Stamps (depending
on the model, they range from less than a dollar to around $6). They
are also more powerful; you can program them in the C language, and
they have a lot of on-chip “peripherals” like
timers,
analog-to-digital converters, pulse-width-modulation outputs, etc.
The model I used is the 18F1320, which is one of the more powerful
ones. PICs are used more in professional products because of their
low cost and high power, but the drawback versus the Stamp is that
they're harder to use. They need an external programmer; you can get
a serial-port-based programmer for $13 on Ebay, which is what I
recommend. Microchip, the PIC manufacturer, sells fancy programmers
for like $100, but I don't think that's worth it. Mine is called a
“JDM programmer.” It connects to a serial port, and
to
use it, I write my program in Microchip's free C programming IDE and
compile it, which produces a binary .hex file. Then I use the free IC-Prog
program to
open that hex file and send it through the programmer to the PIC.
The
final version of the Starburst Turret uses a Microchip PIC for the
microcontroller. PICs are much cheaper than BASIC Stamps (depending
on the model, they range from less than a dollar to around $6). They
are also more powerful; you can program them in the C language, and
they have a lot of on-chip “peripherals” like
timers,
analog-to-digital converters, pulse-width-modulation outputs, etc.
The model I used is the 18F1320, which is one of the more powerful
ones. PICs are used more in professional products because of their
low cost and high power, but the drawback versus the Stamp is that
they're harder to use. They need an external programmer; you can get
a serial-port-based programmer for $13 on Ebay, which is what I
recommend. Microchip, the PIC manufacturer, sells fancy programmers
for like $100, but I don't think that's worth it. Mine is called a
“JDM programmer.” It connects to a serial port, and
to
use it, I write my program in Microchip's free C programming IDE and
compile it, which produces a binary .hex file. Then I use the free IC-Prog
program to
open that hex file and send it through the programmer to the PIC.
The circuit
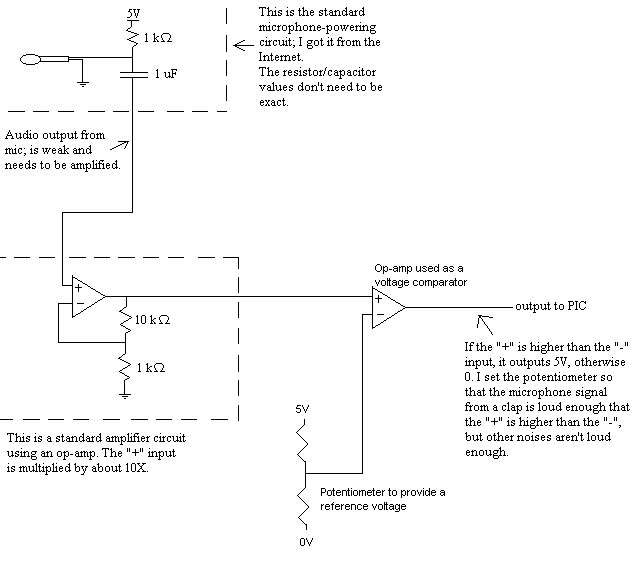
The basic idea of the sensing circuit is that it compares the microphone voltage to a reference voltage, and sends the PIC a logic 1 if the mic output is higher and 0 otherwise. If you look on an oscilloscope, the signal from a clap is a nice sharp series of spikes that are larger than other sounds, and that's why such a simple circuit works. I just assume that the two microphones' circuits will be triggered by the same spike. Occasionally that doesn't happen, which is why I have the user clap 5 times. The program takes those 5 time measurements and throws out any time measurement that is different from all the others by more than 10%, and then it averages the ones that are left. (The bad times are usually random, while the good ones are close to each other.) Here's the circuit for one microphone:
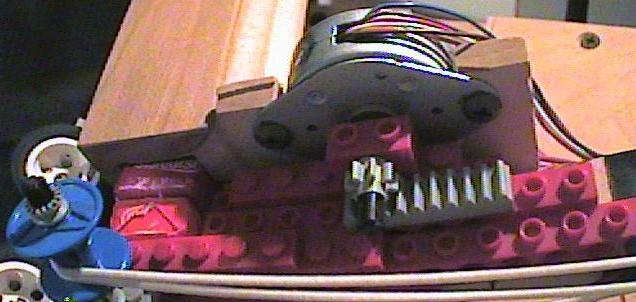
The circuit and PIC are all on a solderless breadboard (around $15 from Fry's or Outpost.com). As far as controlling the motors, I used stepper motor drivers for the two step motors because I could get them free from my college. I used an NPN transistor from Jameco to turn the spinning DC motors on and off. All in all, the electronics were very cheap for this project. Look at "How to build things like this" for more on how I build circuits.
The PIC C source code can be downloaded here: clap.zip (9 KB)